The difference between precision, trueness and accuracy

Precision, trueness and accuracy – do you know the difference? It would not be surprising if you associate all three terms with the same meaning, since in daily life they are often lumped together. But in metrology and statistics, these terms do fundamentally differ.
This is exactly why we have decided to write this blogpost because precision, accuracy, and trueness are often confused. Thus, after reading it, you will have a better understanding of what these three metrics are and how they help you evaluate measurement results.
Precision – a measure of dispersion
In laboratory or even in field tests, one usually does not perform just one measurement, but repeats the experiment several times. But why does one do this; should not one measurement be sufficient?
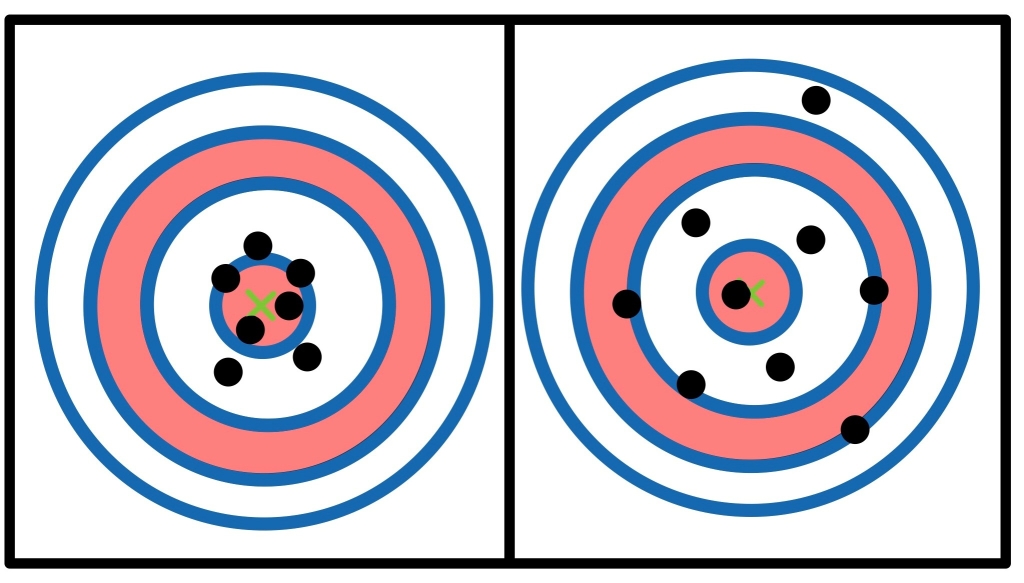
One reason for repeating measurements is for evaluating the precision. Only by taking enough measurements is it possible to determine precision. But now, what is precision? Take a look at the figure below. Each black dot shows the result of one measurement. What do you notice? – In the experiment on the right, the individual measurements are far apart and not every measurement provides the same value. In the experiment on the left, however, all measurements provide almost the same value. It is precisely this scattering of the measured values that is called precision.

High precision (left) and low precision (right)
The precision is high when the measured values are close to each other. However, the precision becomes smaller the more different the measured values are from each other. This also shows that a single measurement cannot be precise. Precision can only be determined by a large number of measurements. However, precision says nothing about the true value of the measurement. A result can be very precise but still far from the true value of the measurand.

High precission but far form real value
The cause of low precision are in many cases random, so-called statistical, errors. These errors can be caused by interactions of the environment with our object to be measured. But also the measuring device itself can become a victim of such statistical errors.
Trueness – determining the true value
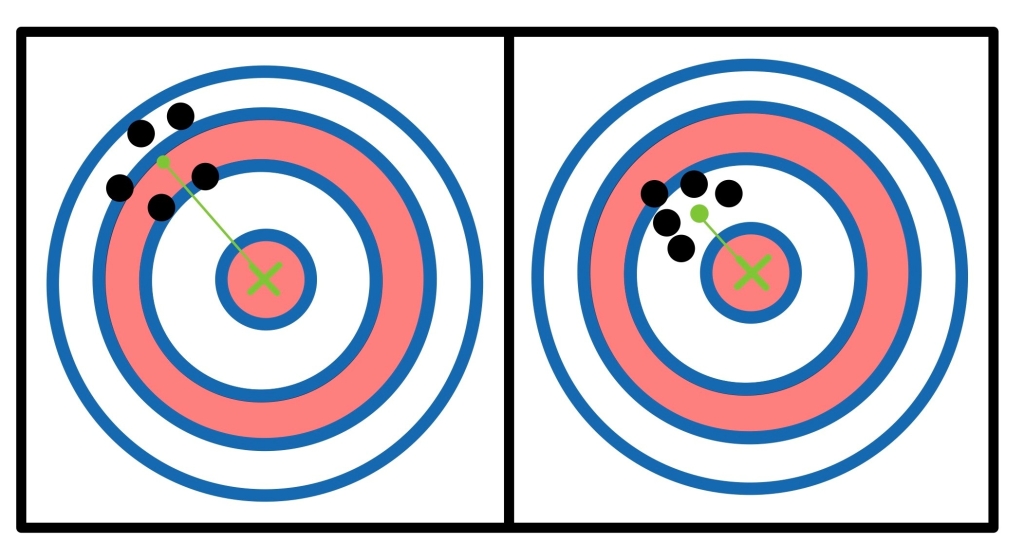
In contrast to precision, trueness provides information about how far away the result of an experiment is from the true value. If a measurement has a high trueness, the mean value of the measurements is close to the real value. If a measurement has a low trueness, the mean value of the measurement series is far away from the real value. This can be seen in the figure below.

Low trueness (left) and higher trueness (right)
But how do you determine the “real value” of a measurand in the first place? The real value is usually of a purely theoretical nature since no measuring instrument is infinitely accurate and can measure the real value. For this reason, one often establishes a self-defined reference value. The difference between this reference value and the mean value of the measurements defines the trueness. Defining a reference value and determining the trueness is often the task of calibration. We have already written a separate blog post about this, which you can read here.
The cause of low trueness are systematic errors, which often depend on the measuring device itself. For example, think of a dart player who always just misses the center of the dartboard. You are of course interested in why he always misses exactly the center and therefore you ask him. The answer: He has a bent arm and therefore always misses. This represents a systematic error.
Accuracy – true and precise
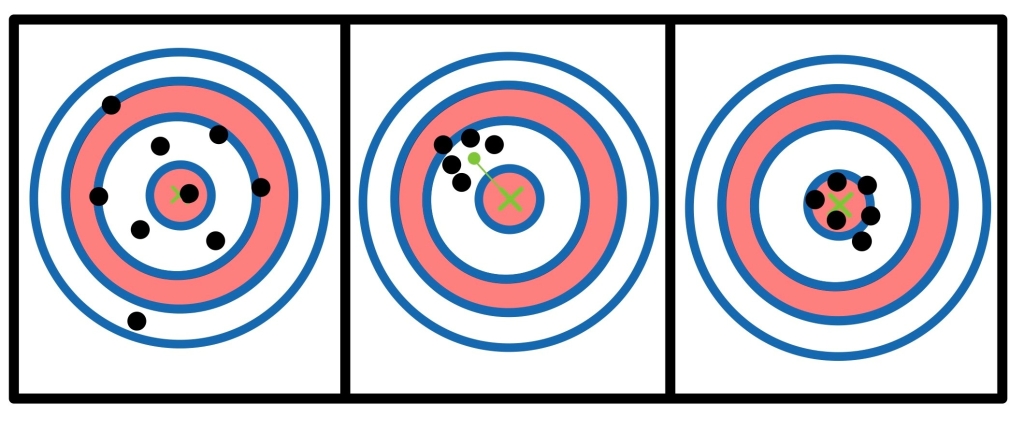
As you have probably noticed, the trueness does not allow any statement about the scatter of the measured values. The measured values can have a high scatter (low precision) but have a very high trueness. The same is true in reverse: measured values with low trueness can be very precise. So, in practice, we need a metric that combines both. This metric is the accuracy.
To have a high accuracy, a series of measurements must be both precise and true. Therefore, high accuracy means that each measurement value, not just the average of the measurements (see trueness), is close to the real value. Thus, if your measuring device is very accurate, you can rely on each measurement and may not need to repeat it.

Low accuracy due to low precision (left); low accuracy due to low trueness (middle); high accuracy due to high precision and trueness (right)
The accuracy of a measuring device is often given in percent and indicates by how many percent the measurement result can deviate from the real value. However, how accurate a measuring device needs to be, depends very much on the applications. While high accuracy is always practical, it is not always necessary. If, for example, the measurement of the outside temperature deviates 5 % from the real temperature, this is usually not a problem (at 20 °C this would be an error of 1 °C). However, when measuring current and voltage, it is often necessary to perform measurements with an accuracy of a few tenths of a percent.
DEWETRON’s DAQ systems: precise, true and accurate
Are you looking for measuring instruments that convince with high accuracy but are easy to operate and modular at the same time? Then you have come to the right place. DEWETRON is a manufacturer of measuring instruments with the highest quality standards. Our Mixed Signal Power Analyzers offer outstanding accuracy and precision with a measurement error of 0.03 %. You can rely on these measurements!
However, not only are all our DAQ systems accurate, they are also modular and adapt exactly to your needs. Do you need more voltage inputs? – This is no problem for our TRION(3)-POWER modules. Do you need exact synchronization between your measuring devices? – Just use our TRION-TIMING module. We have the right modules for every application. The possibilities that are available to you are almost unlimited.
If you want to contact us or just want to learn more about our products, visit the DEWETRON website. There you will find our customer care center, whitepapers, video tutorials and much more. Additionally, we also look forward to hear from you on Twitter, LinkedIn or Facebook.


